


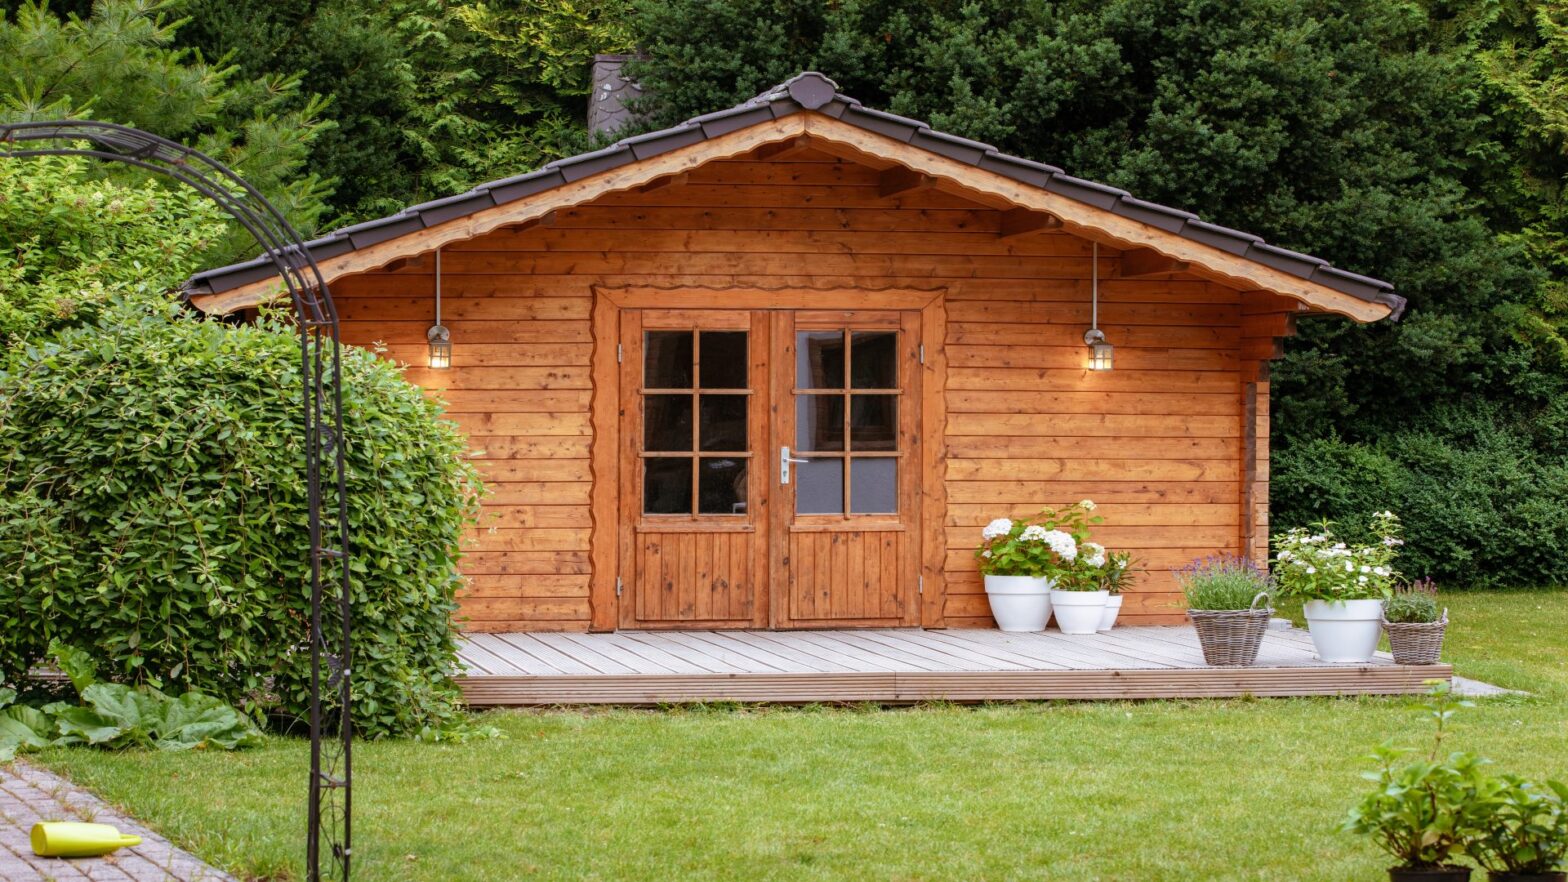


You’ve finally decided to add a shed to your property, and you’re probably excited about all that extra space. Maybe you need somewhere to stash your lawn equipment, or perhaps you’re dreaming of a workshop where you can actually find your tools. Either way, choosing where to put that shed is way more important than most people think. Get it wrong, and you’ll be dealing with drainage issues, angry neighbors, or worse – having to move the whole thing later.
The truth is, there’s no one-size-fits-all answer here. Your perfect shed location depends on what you’re planning to use it for, what your local rules say, and honestly, what makes sense for your daily life. I’ve seen people place sheds in spots that looked great on paper but turned out to be a total nightmare in practice. Let’s walk through what you actually need to consider so you don’t end up making those same mistakes.
Think about how you’ll actually use it
Before you start measuring distances and checking property lines, take a minute to think about what this shed is really for. If you’re storing gardening tools and you have to walk across your entire yard every time you need a rake, you’re going to stop using half your tools pretty quickly. Storage sheds and garages work best when they’re positioned with your daily routine in mind, not just tucked into whatever empty corner happens to be available.
Planning to use your shed as a workshop? You’ll want decent natural light and maybe some distance from the house if you’re going to be running power tools at odd hours. Thinking more along the lines of a home office or studio space? Consider privacy and noise levels. If your shed backs up to your neighbor’s patio where they entertain every weekend, that quiet workspace might not stay so quiet.
For bike storage or equipment you use regularly, proximity to your driveway makes life easier. There’s nothing worse than hauling a heavy lawn mower through tight spaces every week. Set yourself up for success by thinking through the actual logistics of getting in and out with whatever you’re storing.
Know the rules before you commit
Here’s where things get real. Every municipality has its own set of rules about where you can and can’t put accessory structures. These setback requirements typically specify minimum distances from property lines, other buildings, and sometimes even things like septic systems or wells. Most places require at least five to ten feet from rear and side property lines, but your area might be completely different.
Don’t skip the permit process, even if your neighbor’s cousin’s friend said they built theirs without one. Getting caught without proper permits can mean fines or even having to tear down your brand new shed. The permitting office can walk you through exactly what you need and what restrictions apply to your specific property. Yeah, it’s a hassle, but it beats dealing with legal headaches later.
If you live in a neighborhood with a homeowners association, you’ve got another layer of approval to deal with. HOAs often have opinions about shed color, roof style, and visibility from the street. Some are reasonable, others are incredibly picky. Either way, getting their approval upfront saves you from potential conflicts down the road.
This is actually where working with the right company can make your life significantly easier. When you order from storageshedsandgarages.com, they handle the permit headaches for you. Their team knows local building codes inside and out and takes care of the paperwork so you don’t have to figure it all out yourself. Plus, their sheds are built by Amish craftsmen who’ve been perfecting their construction methods for generations, which means you’re getting quality that actually meets or exceeds code requirements.
Ground conditions matter more than you’d think
You might have the perfect spot picked out, but if it turns into a swamp every time it rains, you’re going to have problems. Wet, low-lying areas are terrible for shed placement. The moisture will wreck your shed’s foundation over time, promote mold growth, and generally make accessing your stuff miserable when the ground is muddy.
Look for spots that drain well and dry out quickly after storms. Slightly elevated areas work great. If you’re not sure which parts of your yard hold water, take a walk around after a heavy rain and see where puddles form. Those are your areas to avoid.
Rocky soil can be tricky to level, but it’s workable with the right foundation prep. Clay drains poorly but provides a stable base if you address the drainage issue. Tree roots are another consideration – large roots can shift and potentially damage your shed’s foundation over time as they grow. And speaking of trees, building directly under heavy branches is asking for trouble when storm season hits.
Sun exposure is a balancing act
Sunlight affects both how comfortable your shed is to use and how long it lasts. A shed in full sun all day gets incredibly hot in summer, which is rough if you’re using it as a workspace. The constant UV exposure also wears down paint and roofing materials faster. On the flip side, a completely shaded shed in a heavily wooded area stays damp longer, invites mold and mildew, and becomes a cozy home for rodents you definitely don’t want around.
The sweet spot is usually somewhere with partial shade – enough sun to keep things dry and provide natural light, but not so much that you’re dealing with extreme heat. Think about the sun’s path through different seasons too. That shady spot in June might be in full blast come winter when the trees drop their leaves.
If your planned location is shadier than you’d like, you can always add extra windows or install electric lighting. Many people find that the right placement relative to trees and buildings matters more than obsessing over perfect sun exposure.
Accessibility for delivery and future maintenance
When your shed arrives, delivery trucks need clear access to get it where it’s going. Think about the path from your driveway to your chosen spot. Are there low-hanging branches? Tight turns around your house? A gate that won’t quite fit a trailer through? These logistics might seem minor until you’re dealing with them on delivery day.
If you’re ordering a custom shed built to your specifications, you want to make sure the delivery and installation crew can actually get to the site efficiently. This is another area where working with experienced companies pays off – they’ve seen every property configuration imaginable and can advise you on what will and won’t work for delivery.
Leave yourself some maneuvering room too. You’ll need to mow around the shed, potentially do maintenance on the siding or roof, and maybe add landscaping later. A shed crammed into a tight corner becomes a pain to maintain over time.
Your property’s unique quirks
Every property has underground utilities running somewhere – water lines, gas pipes, electrical cables, internet. Before you finalise your shed location, call 811 (it’s free) to have utility companies come mark where their lines run. The last thing you want is to discover your perfect shed spot sits right on top of a main water line. If repairs are needed in the future, you could be forced to move or remove the shed.
Corner lots and irregularly shaped properties come with their own challenges. You might have multiple “front” yards as far as zoning is concerned, which affects where you can legally place structures. Properties with slopes need special consideration for drainage and foundation leveling.
Making it look good matters
A shed doesn’t have to be an eyesore. Think about how it fits into your overall property aesthetic. Do you want it visible from the street, or tucked away? Should it match your house’s color scheme, or can it be something different?
Some people landscape around their sheds with shrubs or create a small patio area to make the structure feel intentional rather than just plopped down. Others position sheds strategically to block less attractive views or create natural divisions in their yard.
Consider your neighbors’ viewpoint too. Positioning your shed so it blocks their view or dominates the backdrop of their patio isn’t neighborly. A quick conversation before installation can prevent future friction. Most people appreciate the heads up, even if they have no objections.
Key factors checklist
When you’re narrowing down your options, run through these essential points:
- Measure minimum setback distances from all property lines and note any restrictions about proximity to other structures like your house or garage.
- Verify the ground drains well by checking after rain or running a hose and watching where water collects or runs off.
- Confirm you have clear delivery access with no overhead obstacles and gates wide enough for equipment.
- Check that no underground utilities run through your chosen spot by contacting 811 for free marking service.
- Consider sun exposure throughout the day and how seasonal changes affect light and shade patterns in that location.
- Think through your daily usage patterns and whether the location makes sense for how often you’ll access the shed and what you’ll be storing.
- Make sure the spot works aesthetically with your property and doesn’t negatively impact neighbor relations.
- Verify all local permits and HOA approvals are in place before you start any site preparation work.
Custom solutions for unique properties
Sometimes standard shed placement guidelines don’t quite work for your specific situation. Maybe you have an unusual lot shape, significant slope, or just really specific needs for your space. This is where being able to order custom-designed structures makes a huge difference.
Custom sheds can be designed to fit odd spaces, include specific door placements for better access, or accommodate unique foundation requirements. When you’re working with builders who create custom solutions rather than just one-size-fits-all options, you can actually optimise for your property’s constraints instead of fighting against them.
The craftsmanship that goes into custom Amish-built structures means you’re not sacrificing quality for customisation either. These builders have been refining their techniques for generations, and they understand how to create durable structures that work with different site conditions.
Getting it right the first time
Moving a shed after it’s installed is expensive, complicated, and sometimes just not possible depending on the foundation type. That’s why taking the time to get the placement right from the start is so important. Visit your proposed site at different times of day to see how sun, shade, and traffic patterns actually play out. Stand there and imagine going through your daily or weekly routine with the shed in that spot.
Talk to your immediate neighbors if the shed will be anywhere near your shared property line. Most people are fine with it, but giving them a heads up shows respect and prevents surprises. If they have concerns, it’s better to know before installation than after.
The bottom line is that shed placement requires thinking through practical daily use, legal requirements, and long-term maintenance access. When you combine smart site selection with quality construction and professional installation support, you end up with a shed that genuinely adds value to your property rather than becoming a source of regret. Take your time with this decision – your future self will thank you every time you walk out to grab something from a perfectly placed shed that just works.