To the first time DIYer installing skirting boards may seem a daunting task laced with problems and inaccuracies to trip up on. But that needn’t be so! We’ve put together 5 tips to help smooth the process of finding angles, cutting and fixing your first skirting boards.
Get the right kit
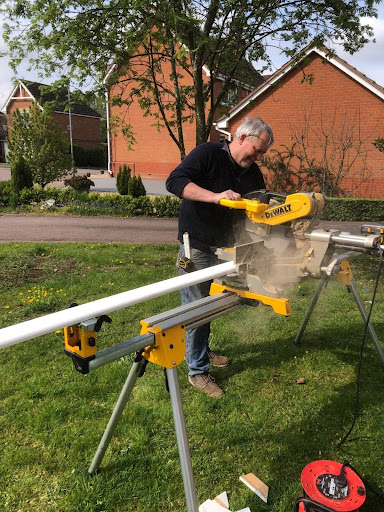
Skirting is long and awkward to handle and cut. Getting the right kit really does make the job easier – especially for cutting. I would recommend a mitre saw is purchased and a stand to put it on, that will support the ends of the board level with the saw base while you cut the skirting.
Here’s what we used at the weekend:
Finding your angle quickly – draw it out
This can be done with paper taped to the floor as we have done, or overlapping two sections of wood and marking where they meet on the inside and outside edge.
Offer your paper up to the wall and tape it down.
Offer the skirting up to the wall on top of the paper and mark the front face for both sides of the corner of your skirting. Offer a further piece on its face up to the mark just drawn and mark its opposite edge.
Repeat the marking process for the opposite side of the corner to create 2 intersects. And connect them together to get your cut angle.
Transfer the angle to your mitre saw by carefully lining a sliding bevel up to the drawn mark, tightening the bevel and taking the bevel to your saw to line the saw blade up against.
Blade Grazing
Avoid ‘grazing the end of the board when cutting. Grazes on the end of the piece can stop joins marrying up properly when you offer the pieces up to each other.
Grazing occurs when the piece touches the blade of the saw as you raise the blade. Get into the habit of drawing the piece from the blade before raising it.
Fixing skirting to the wall – gripfill/screws/pins
We get a lot of questions regarding how best to fix skirting to a wall – especially around adhesives which are in theory easy to use.
Adhesives like Gripfill can be applied, but I would recommend not using it on its own, as pushing to the wall does not push it into the wall enough to eliminate any gap between skirting and wall the adhesive can in some cases also hold it off the wall if not pushed on with adequate force for long enough, and this can be a long time!
Instead supplement or replace the adhesive with pins or screws. This will pull the skirting into the wall and eliminate any gap.
Avoid using skirting that’s thicker than your architrave
It is normal for architrave to be the same thickness as your skirting, so it either sits flush with, or stands proud of your skirting. It makes the mouldings flow better visually. Architrave standing proud of skirting is ‘allowed’ because it is a finished edge of the architrave.
Skirting standing proud of architrave is not ‘allowed’ as the exposed skirting edge is a sawn edge not a finished edge, and also appears more awkward especially where the moulding juts out.